在 CentOS 上安装 Elastic Stack 7.16
本文讲解如何在 CentOS 上安装 Elastic Stack 7.16.3。测试环境有两台虚拟机组成。
参考文章:刘晓国的博客 - Elastic:在 CentOS 上一步一步安装 Elastic Stack
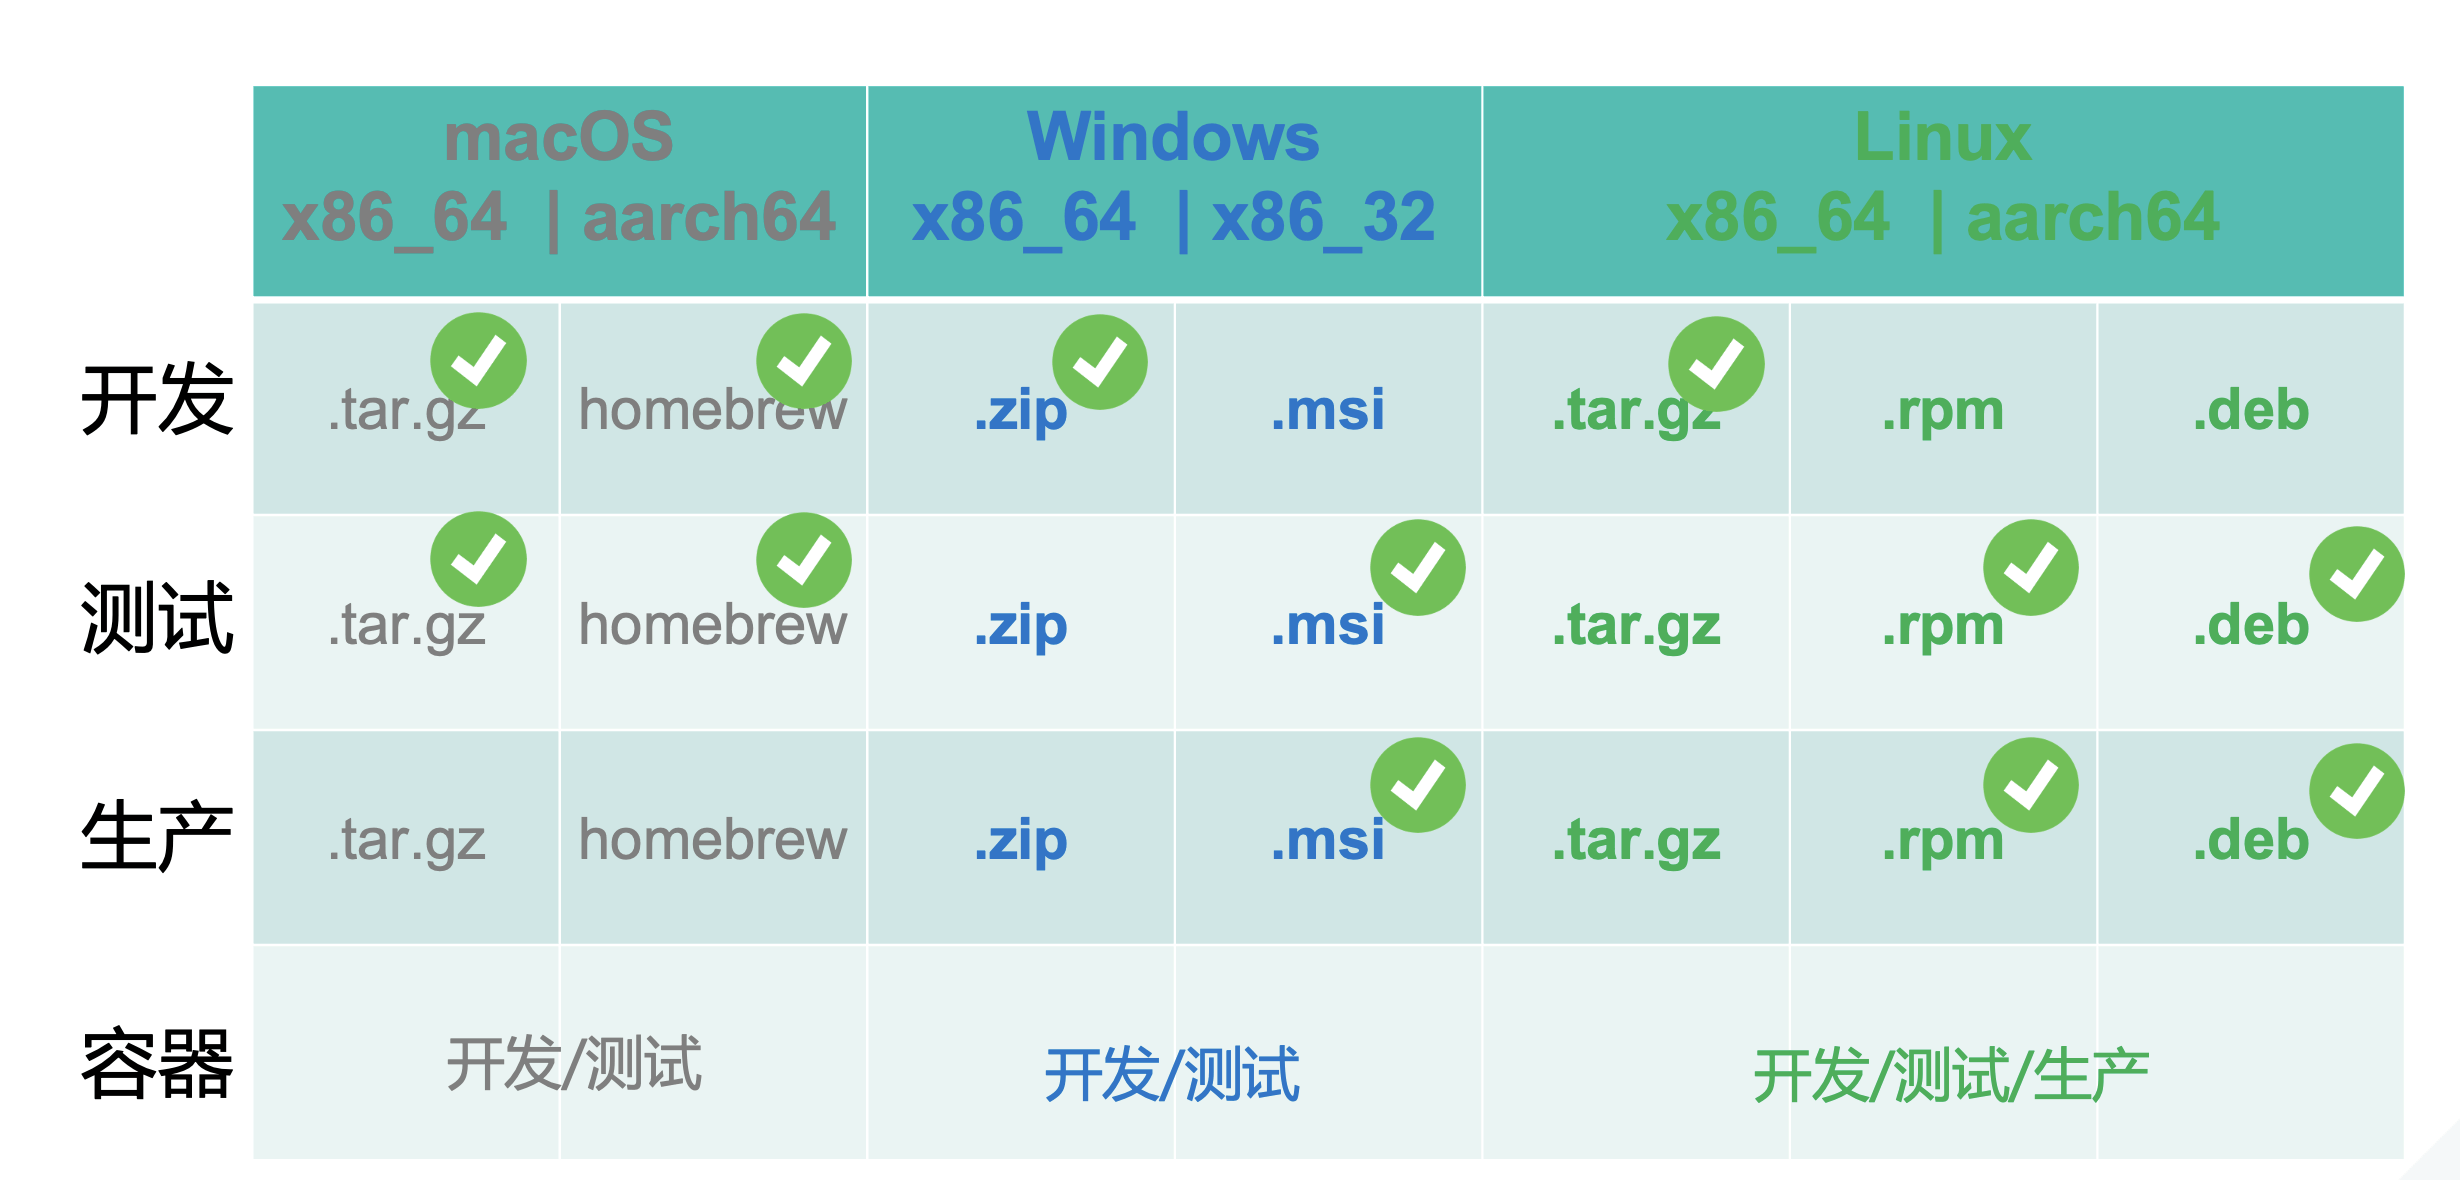
Elasticsearch 的各种安装包类型,以及和所适合环境的建议。
以下是本实验建议的环境概况:
虚拟机 1
- Elasticsearch
- Kibana
虚拟机 2
- Logstash
- MetricBeat
虚拟机配置推荐:
虚拟机 1
- CPU x 2, 内存 4+GB,磁盘 8+GB
- 私有/共有 IP 地址,开放端口:22、5601、9200;下文是:192.168.1.141 。
虚拟机 2
- CPU x 1, 内存 2+GB,磁盘 8+GB
- 私有/共有 IP 地址,开放端口:22;下文是:192.168.1.132 。
注意:这里使用的虚拟机可以是云主机,也可以是本地创建的虚拟机,用 Vagrant 创建本地虚拟机的方法参看:刘晓国的博客 - Elastic:在 CentOS 上一步一步安装 Elastic Stack
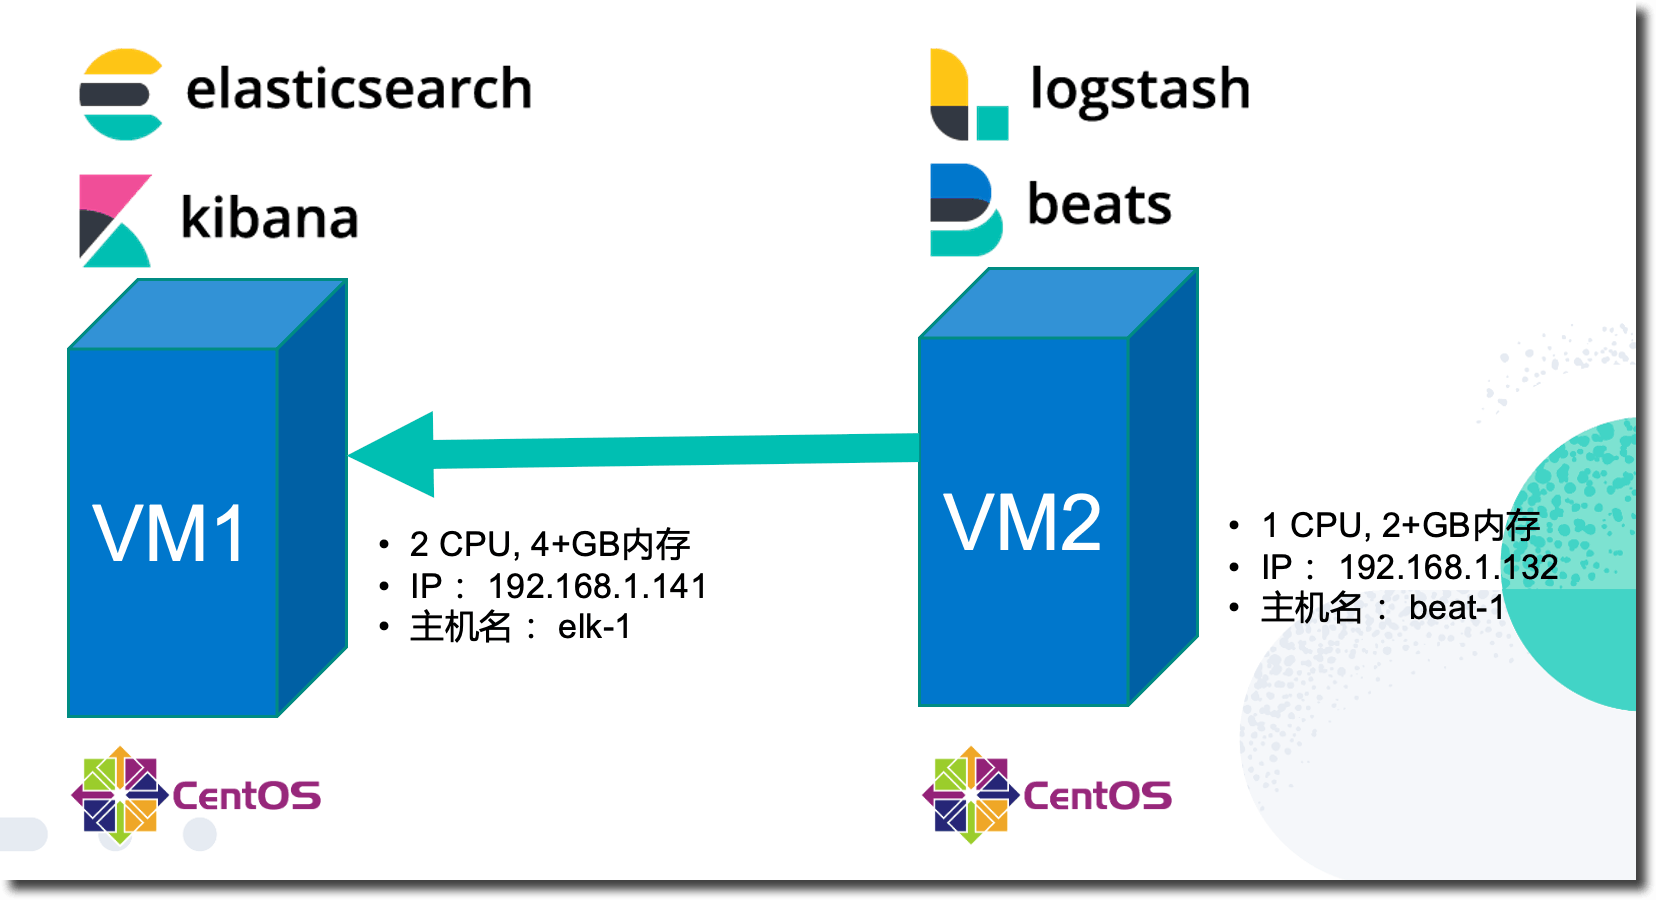
建议通过使用两个虚拟机可以达到最佳的练习效果,如果条件有限,至少准备一个虚拟机,配置不低于虚拟机 1。本文使用的操作系统是 CentOS 8;。
安装 Elasticsearch 服务器
系统准备
首先 SSH 登陆至虚拟机 1,执行下面的命令,完成设置主机名,关闭防火墙,测试虚拟机 2 是否可以ping通。
hostnamectl set-hostname elk-1
systemctl status firewalld
systemctl stop firewalld
ping 192.168.1.132
SSH 登陆虚拟机 2,执行下面的命令,完成设置主机名,关闭防火墙,测试虚拟机 1 是否可以 ping 通;安装 Logstash 所需要的 JDK,并验证 java 版本。
hostnamectl set-hostname beat-1
systemctl status firewalld
systemctl stop firewalld
ping 192.168.1.141
yum install -y java-1.8.0-openjdk
java -version
选择最优 YUM 源
如果你使用的是国外公有云的虚拟机,请直接使用 Elastic 官方网站提供的 yum 源服务器。
[elasticsearch]
name=Elasticsearch repository for 7.x packages
baseurl=https://artifacts.elastic.co/packages/7.x/yum
gpgcheck=1
gpgkey=https://artifacts.elastic.co/GPG-KEY-elasticsearch
enabled=0
autorefresh=1
type=rpm-md
本文使用清华的镜像站点:https://mirror.tuna.tsinghua.edu.cn/elasticstack/yum/elastic-7.x/7.16.3/
你在国内各大云厂商的开源镜像网站上都可以找到 Elastic Stack 的 yum 安装源。
- https://mirrors.cloud.tencent.com/elasticstack/
- https://repo.huaweicloud.com/elasticsearch/ 【版本在国内全网最全】
- https://mirrors.aliyun.com/elasticstack/
安装 Elasticsearch 软件包
在虚拟机1中,执行如下免 yum repo 配置的 rpm 软件包安装命令:
yum install -y https://mirror.tuna.tsinghua.edu.cn/elasticstack/yum/elastic-7.x/7.16.3/elasticsearch-7.16.3-x86_64.rpm
查看默认的 Elasticsearch 配置文件,在最后增加以下四行:
cluster.name: elk101
network.host: 0.0.0.0
discovery.type: single-node
xpack.security.enabled: true
注释:0.0.0.0 意味着 Elasticsearch 将响应任何网段的访问请求。
用 vi 在原有配置文件的最后增加四行新配置参数。
vi /etc/elasticsearch/elasticsearch.yml
启动 Elasticsearch 服务:
systemctl daemon-reload
systemctl enable elasticsearch
systemctl start elasticsearch
systemctl status elasticsearch
检查 Elasticsearch 服务的状态和日志:
systemctl status elasticsearch
ls /var/log/elasticsearch/
tail -f /var/log/elasticsearch/elk101.log
journalctl --unit elasticsearch
为 Elasticsearch 系统的所有内置账户设置统一密码 elastic101 ,使用一下命令,并在提示符中输入相同密码之后按回车继续。「仅限测试目的」。
[root@elk-1 ~]# /usr/share/elasticsearch/bin/elasticsearch-setup-passwords interactive -b
Enter password for [elastic]:
Reenter password for [elastic]:
Enter password for [apm_system]:
Reenter password for [apm_system]:
Enter password for [kibana_system]:
Reenter password for [kibana_system]:
Enter password for [logstash_system]:
Reenter password for [logstash_system]:
Enter password for [beats_system]:
Reenter password for [beats_system]:
Enter password for [remote_monitoring_user]:
Reenter password for [remote_monitoring_user]:
Changed password for user [apm_system]
Changed password for user [kibana_system]
Changed password for user [kibana]
Changed password for user [logstash_system]
Changed password for user [beats_system]
Changed password for user [remote_monitoring_user]
Changed password for user [elastic]
[root@elk-1 ~]
在浏览器里访问 Elasticsearch IP地址 + 服务端口址网址,验证密码:<http://192.168.1.141:9200>;使用用户名密码【elastic / elastic101】登陆,应该能够看到下面的结果:
{
  "name": "elk-1",
  "cluster_name": "elk101",
  "cluster_uuid": "dI50FfQtTlq13wlLI93fCw",
  "version": {
    "number": "7.16.3",
    "build_flavor": "default",
    "build_type": "rpm",
    "build_hash": "4e6e4eab2297e949ec994e688dad46290d018022",
    "build_date": "2022-01-06T23:43:02.825887787Z",
    "build_snapshot": false,
    "lucene_version": "8.10.1",
    "minimum_wire_compatibility_version": "6.8.0",
    "minimum_index_compatibility_version": "6.0.0-beta1"
  },
  "tagline": "You Know, for Search"
}
安装 Kibana 服务
SSH 登陆到虚拟机1 上,使用 Elasticserach 所选择的 yum 安装源服务器,执行如下安装命令:
yum install -y https://mirror.tuna.tsinghua.edu.cn/elasticstack/yum/elastic-7.x/7.16.3/kibana-7.16.3-x86_64.rpm
用 vi 从上到下的查看 Kibana 的默认配置参数,vi /etc/kibana/kibana.yml ;并在最后增加下面的内容:
server.host: "0.0.0.0"
elasticsearch.hosts: ["http://localhost:9200"]
elasticsearch.username: elastic
elasticsearch.password: elastic101
i18n.locale: zh-CN
server.publicBaseUrl: http://192.168.1.141:5601
注释:0.0.0.0 意味着 Kibana 将响应任何网段的访问请求。
启动 Kibana 服务:
systemctl daemon-reload
systemctl enable kibana
systemctl start kibana
使用下面的命令检查 Kibana 的状态和日志:
systemctl status kibana
tail -f /var/log/messages
在浏览器里访问 Kibana 服务的 ip + 端口网址: http://192.168.1.141:5601;使用用户名密码【elastic / elastic101】登陆,你应该能够看到 Kibana 登陆后的中文界面。点击 “自己浏览” 按钮进入界面。
点击 “试用样例数据” 链接,添加并且浏览三组 Kibana 内置的样例数据。
安装 Logstash 服务
SSh 登陆到虚拟机 2。先安装 Logstash ,使用 csv 插件导入数据文件到 Elasticsearch 中。
yum install -y https://mirror.tuna.tsinghua.edu.cn/elasticstack/yum/elastic-7.x/7.16.3/logstash-7.16.3-x86_64.rpm
在 /tmp 目录下创建名为 bitcoin 的目录,用 vi 命令在 /tmp/bitcoin 目录下,创建名为 mtgoxusd.csv 的数据文件,该数据文件到内容如下。
Date,Open,High,Low,Close,Volume (BTC),Volume (Currency),Weighted Price
2014-02-25,173.2,173.84343,101.62872,135.0,29886.7532397,3667985.39624,122.729470372
2014-02-24,314.99996,316.78999,131.72093,173.871,94594.0225893,17590531.0124,185.958166604
2014-02-23,260.70495,348.98,220.1,309.99971,38395.103758,11051773.3535,287.843299581
2014-02-22,111.0,290.52557,96.6345,255.53,71861.2880229,11632970.1851,161.88090285
2014-02-21,111.61995,160.0,91.5,111.4,82102.9295521,9798282.70207,119.341450488
注释:这里使用手工创建的 csv 数据文件,你也可以在此处下载网上的任何 csv 格式数据文件。使用自带的 csv 数据文件的话,需要修改一下下面的流水线配置文件,修改表头为合适的字段名称。
用 vi 命令创建logstash 流水线配置文件 vi /etc/logstash/conf.d/csv-loading.conf,csv-loading.conf 配置文件的内容如下:
input {
  file {
    path => "/tmp/bitcoin/*.csv"
    start_position => "beginning"
  }
}
filter {
  csv {
    separator => ","
    #Date,Open,High,Low,Close,Volume (BTC),Volume (Currency),Weighted Price
    columns => ["Date","Open","High","Low","Close","Volume (BTC)", "Volume (Currency)" ,"Weighted Price"]
  }
}
output {
  elasticsearch {
    hosts => "http://192.168.1.141:9200"
    user  => elastic
    password => elastic101
    index => "bitcoin-prices"
  }
}
启动 Logstash 服务。
systemctl enable logstash
systemctl start logstash
systemctl status logstash
journalctl --unit logstash
观察 logstash 服务的状态是否正常,如果服务日志中有错误出现,请排错后在继续后续操作。
使用命令 tail -f /var/log/logstash/logstash-plain.log 查看 Logstash 服务的输出文件。
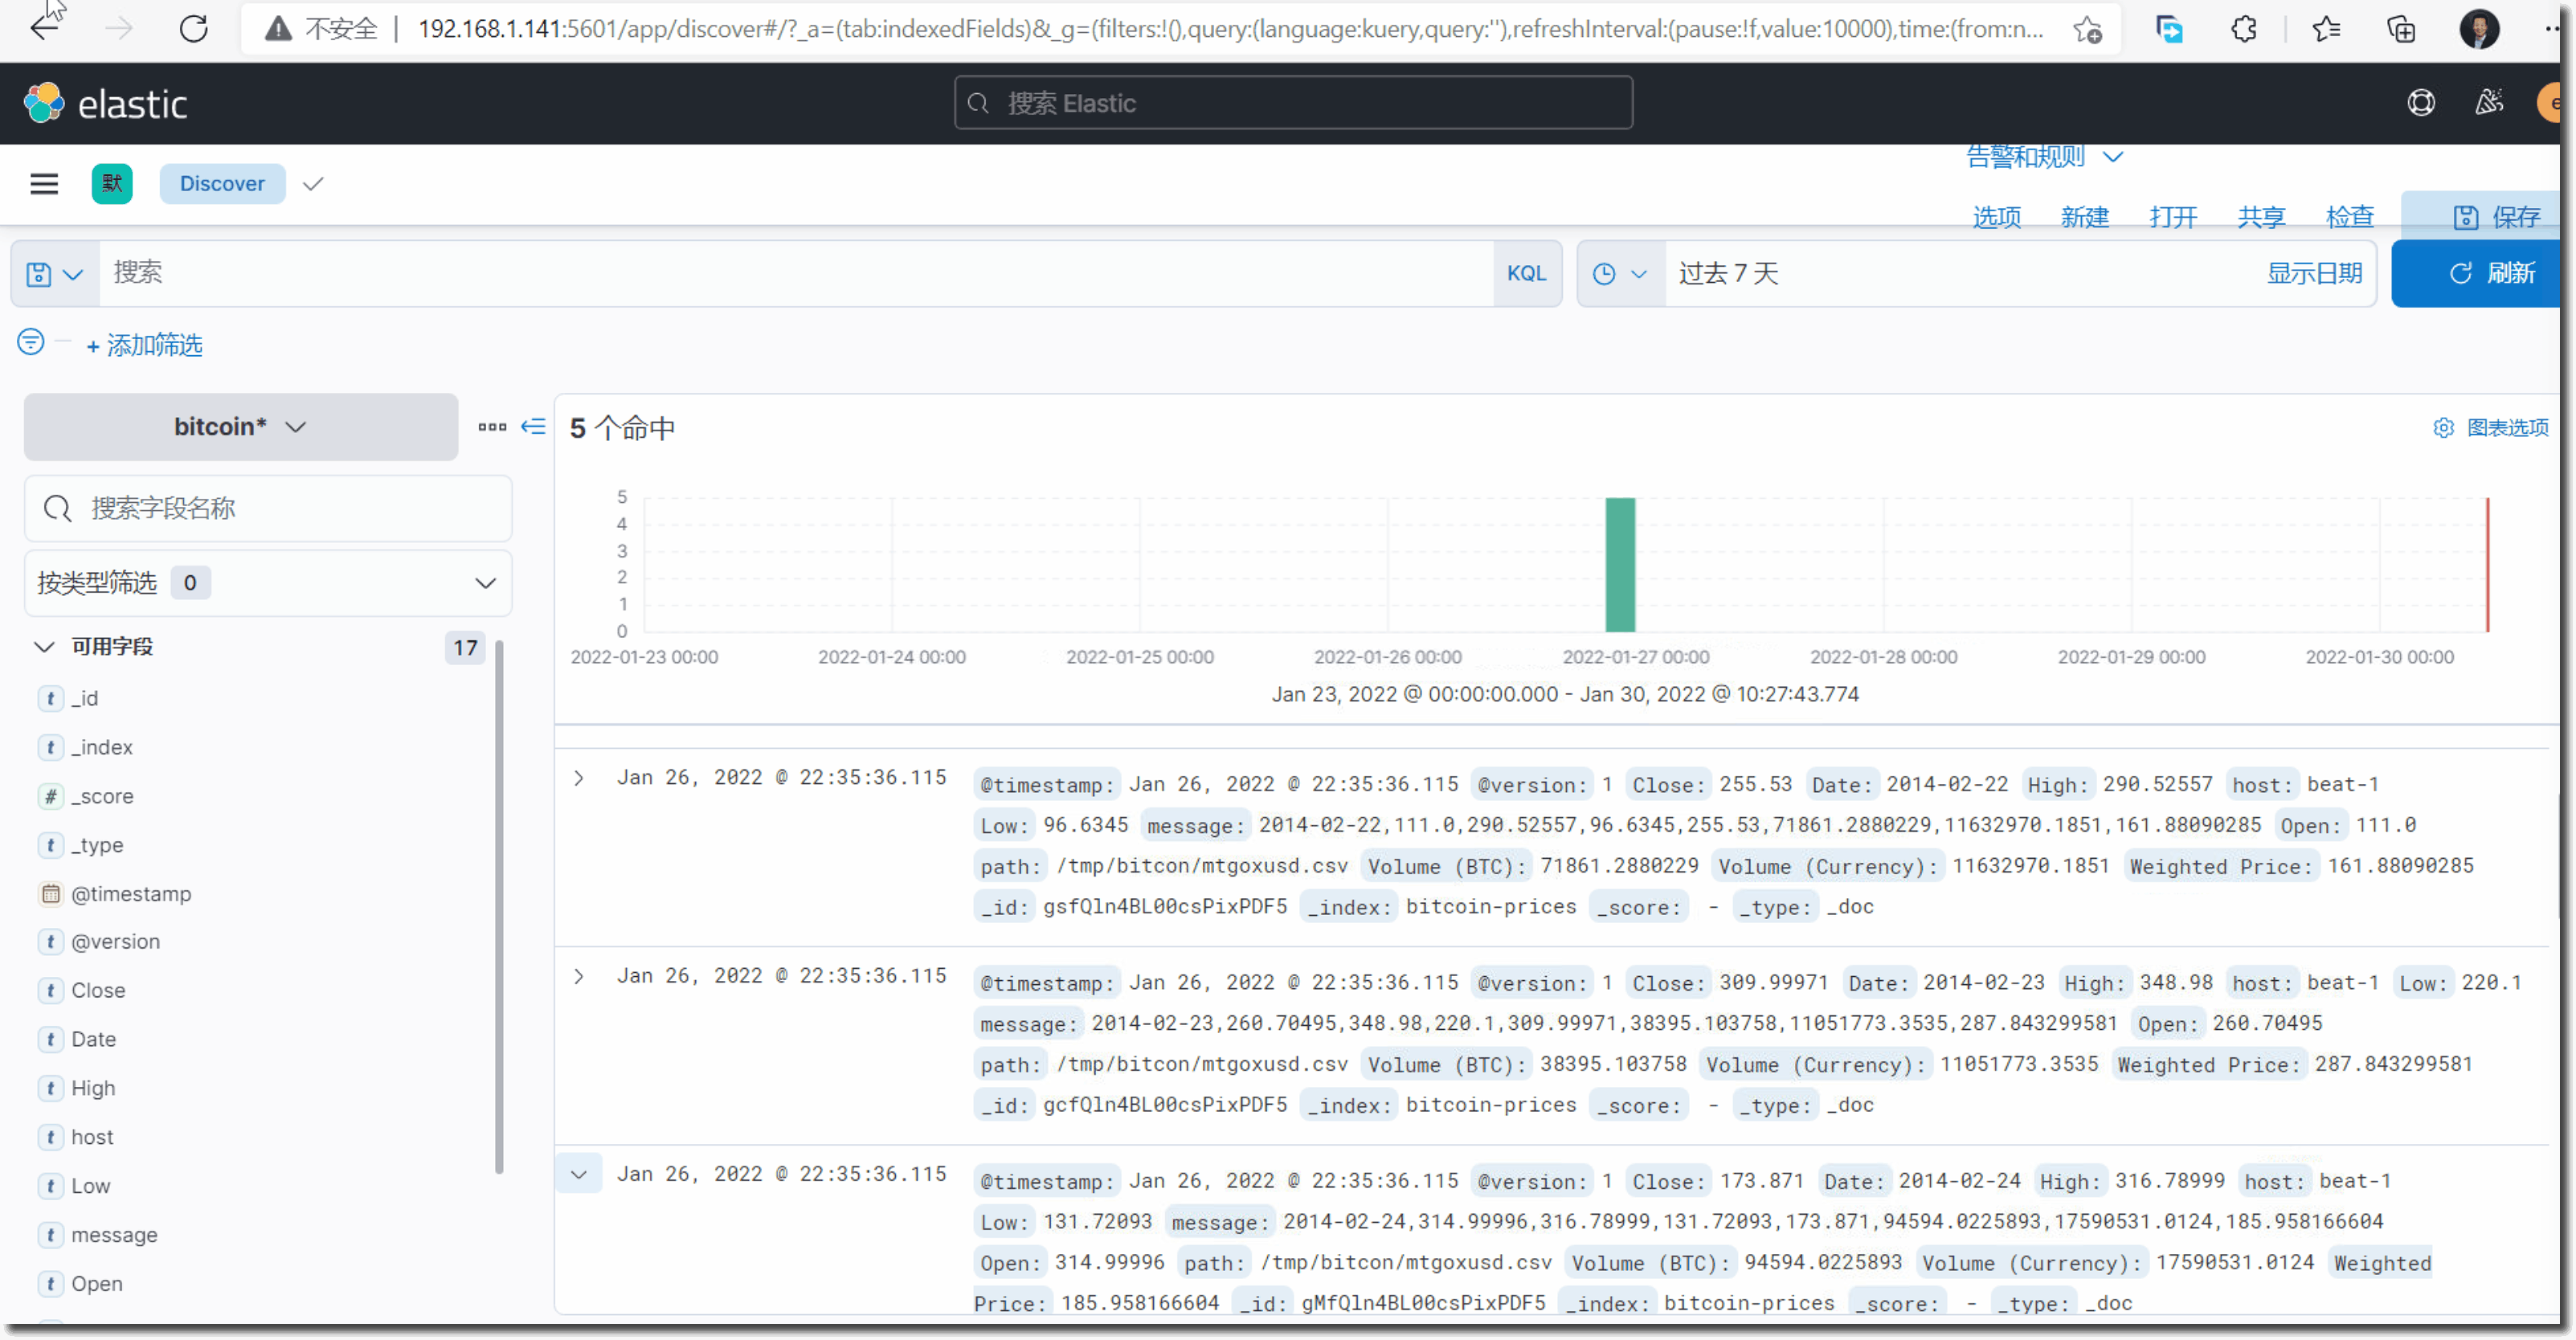
在 Kibana 中执行以下操作流程,查看由 Logstash 所导入的数据:
- 登陆 Kibana 后,点击左侧的菜单
- 在 ‘索引管理’ 菜单中,中查看并确认名为 ‘bitcoin-prices’ 的索引是否存在。
- 进入 ‘索引模式‘ 菜单,并起创建名为 ’bitcon*‘ 的索引模式。
- 在 ‘Discovery’ 菜单中,使用索引模式切换下拉菜单,切换到 ‘bitcon*’ 索引模式,浏览导入的5条数据。
安装 Metricbeat 服务
Logstash 的输入插件中包含 Metricbeat ,但是在这个本实验练习中,我们并不打算使用 Logstash 对 Metricbeat 所采集到的数据进行任何数据加工操作;而且所有虚拟机都在同一个网段中,也没有必要用 Logstash 对 Metricbeat 的数据进行转发。在既不使用 Lostash 的数据转化处理(ETL)功能,也不需要使用 Logstahs 做跨网段转发的情况下,是完全不需要使用 Metricbeat/Filebeat 和 Logstash 的集成的。
Metricbeat 是系统性能监控模块,ssh 登陆到虚拟机 2,安装 Metricbeat 采集这个服务器的操作系统性能指标。
yum install -y https://mirror.tuna.tsinghua.edu.cn/elasticstack/yum/elastic-7.x/7.16.3/metricbeat-7.16.3-x86_64.rpm
进入 Metricbeat 的配置文件目录 cd /etc/metricbeat/,查看 Metricbeat 的配置目录,熟悉目录中的结构和文件。
初始化 Metricbeat 索引,在命令行下运行下面的命令,根据你的网络环境替换其中的相关参数。
metricbeat setup -e  --index-management   --dashboards \
  -E output.elasticsearch.hosts=['192.168.1.141:9200']   \
  -E output.elasticsearch.username=elastic   \
  -E output.elasticsearch.password=elastic101   \
  -E setup.kibana.host=192.168.1.141:5601
从上到下的查看 Metricbeat 配置文件内容, vi /etc/metricbeat/metricbeat.yml 。
在当前目录下创建名为 mb.yml 的文件,内容如下:
metricbeat.config.modules:
  path: ${path.config}/modules.d/*.yml
  reload.enabled: true
  reload.period: 10s

output.elasticsearch:
  hosts: ["192.168.1.141:9200"]
  username: "elastic"
  password: "elastic101"

setup.ilm.check_exists: false
logging.level: error
queue.spool: ~
monitoring.enabled: true
备份默认配置文件,并用以上 mb.yml 配置文件替换默认文件。
mv /etc/metricbeat/metricbeat.yml /etc/metricbeat/metricbeat.yml.bk
cp mb.yml /etc/metricbeat/metricbeat.yml
测试配置文件的语法的正确性,测试与 Elasticsearch 服务器的连接配置参数。
metricbeat test config
metricbeat test output
注释:以上 test config 和 test config Beat 测试命令也同样适用于其他的 Beat,如: FileBeat、AuditBeat 等。
启动并查看 Metricbeat 服务的状态。
systemctl enable  metricbeat
systemctl start  metricbeat
systemctl status  metricbeat
用如下命令查看 Metricbeat 的采集模块有哪些。
metricbeat modules list
从输出中,我们可以看到 Metricbeat 默认启用了操作系统性能采集模块。
在 Kibana 中查看 Metricbeat 的相关仪表板:
- 打开 Kibana 界面
- 打开左侧菜单栏,点击 ‘Dashboard’ 选项
- 在页面的搜索框中输入 system 后,查看 Metricbeat 自带的仪表板,它们都是是
metricbeeat setup命令导入的。 - 点击查看名为 “[Metricbeat System] Overview ECS” 的仪表板。 在 System Overview 和 Host Overview 的两个视图中切换查看所采集到的性能数据。
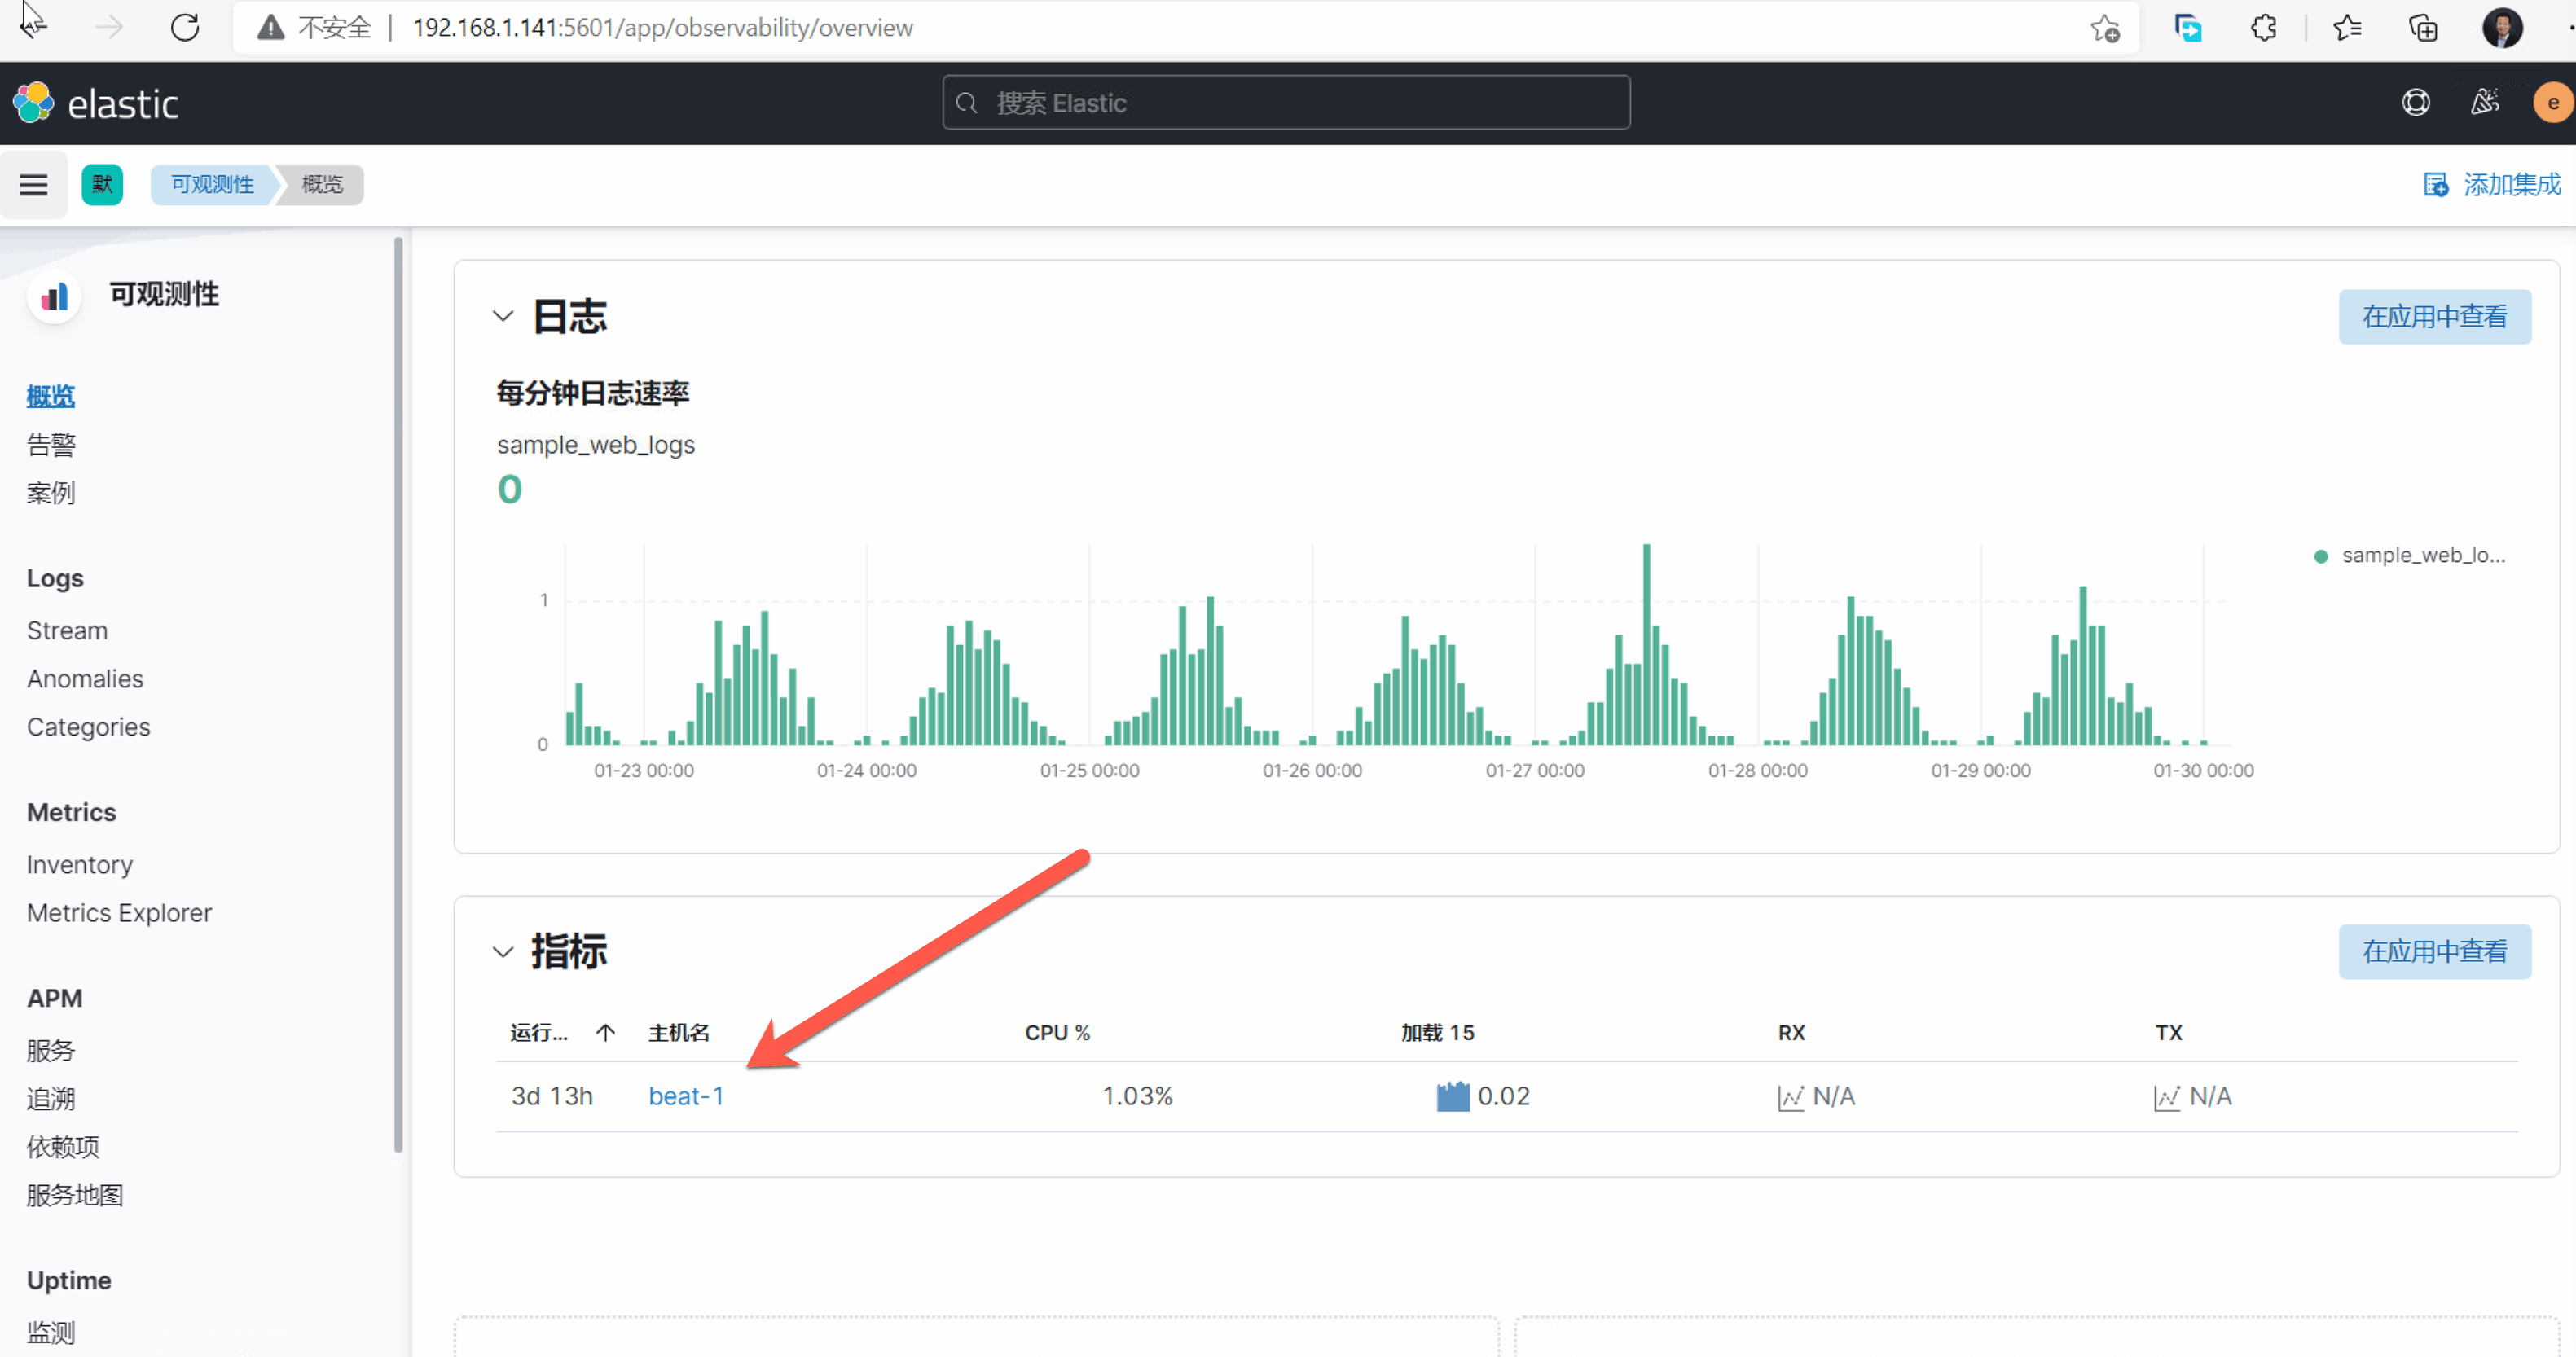
- 进入左侧 ‘Observabile’ 菜单下面的 ’概览‘选项。查看指标下面的,名为 beat-1 的主机。
管理 Elastic Stack
登陆 Kibana ,在 Management 菜单中点击 “堆栈监测”, 并点击 ok 按钮确认,启用 Elastic Stack 的自监控功能,查看集群 elk101 的监控信息。
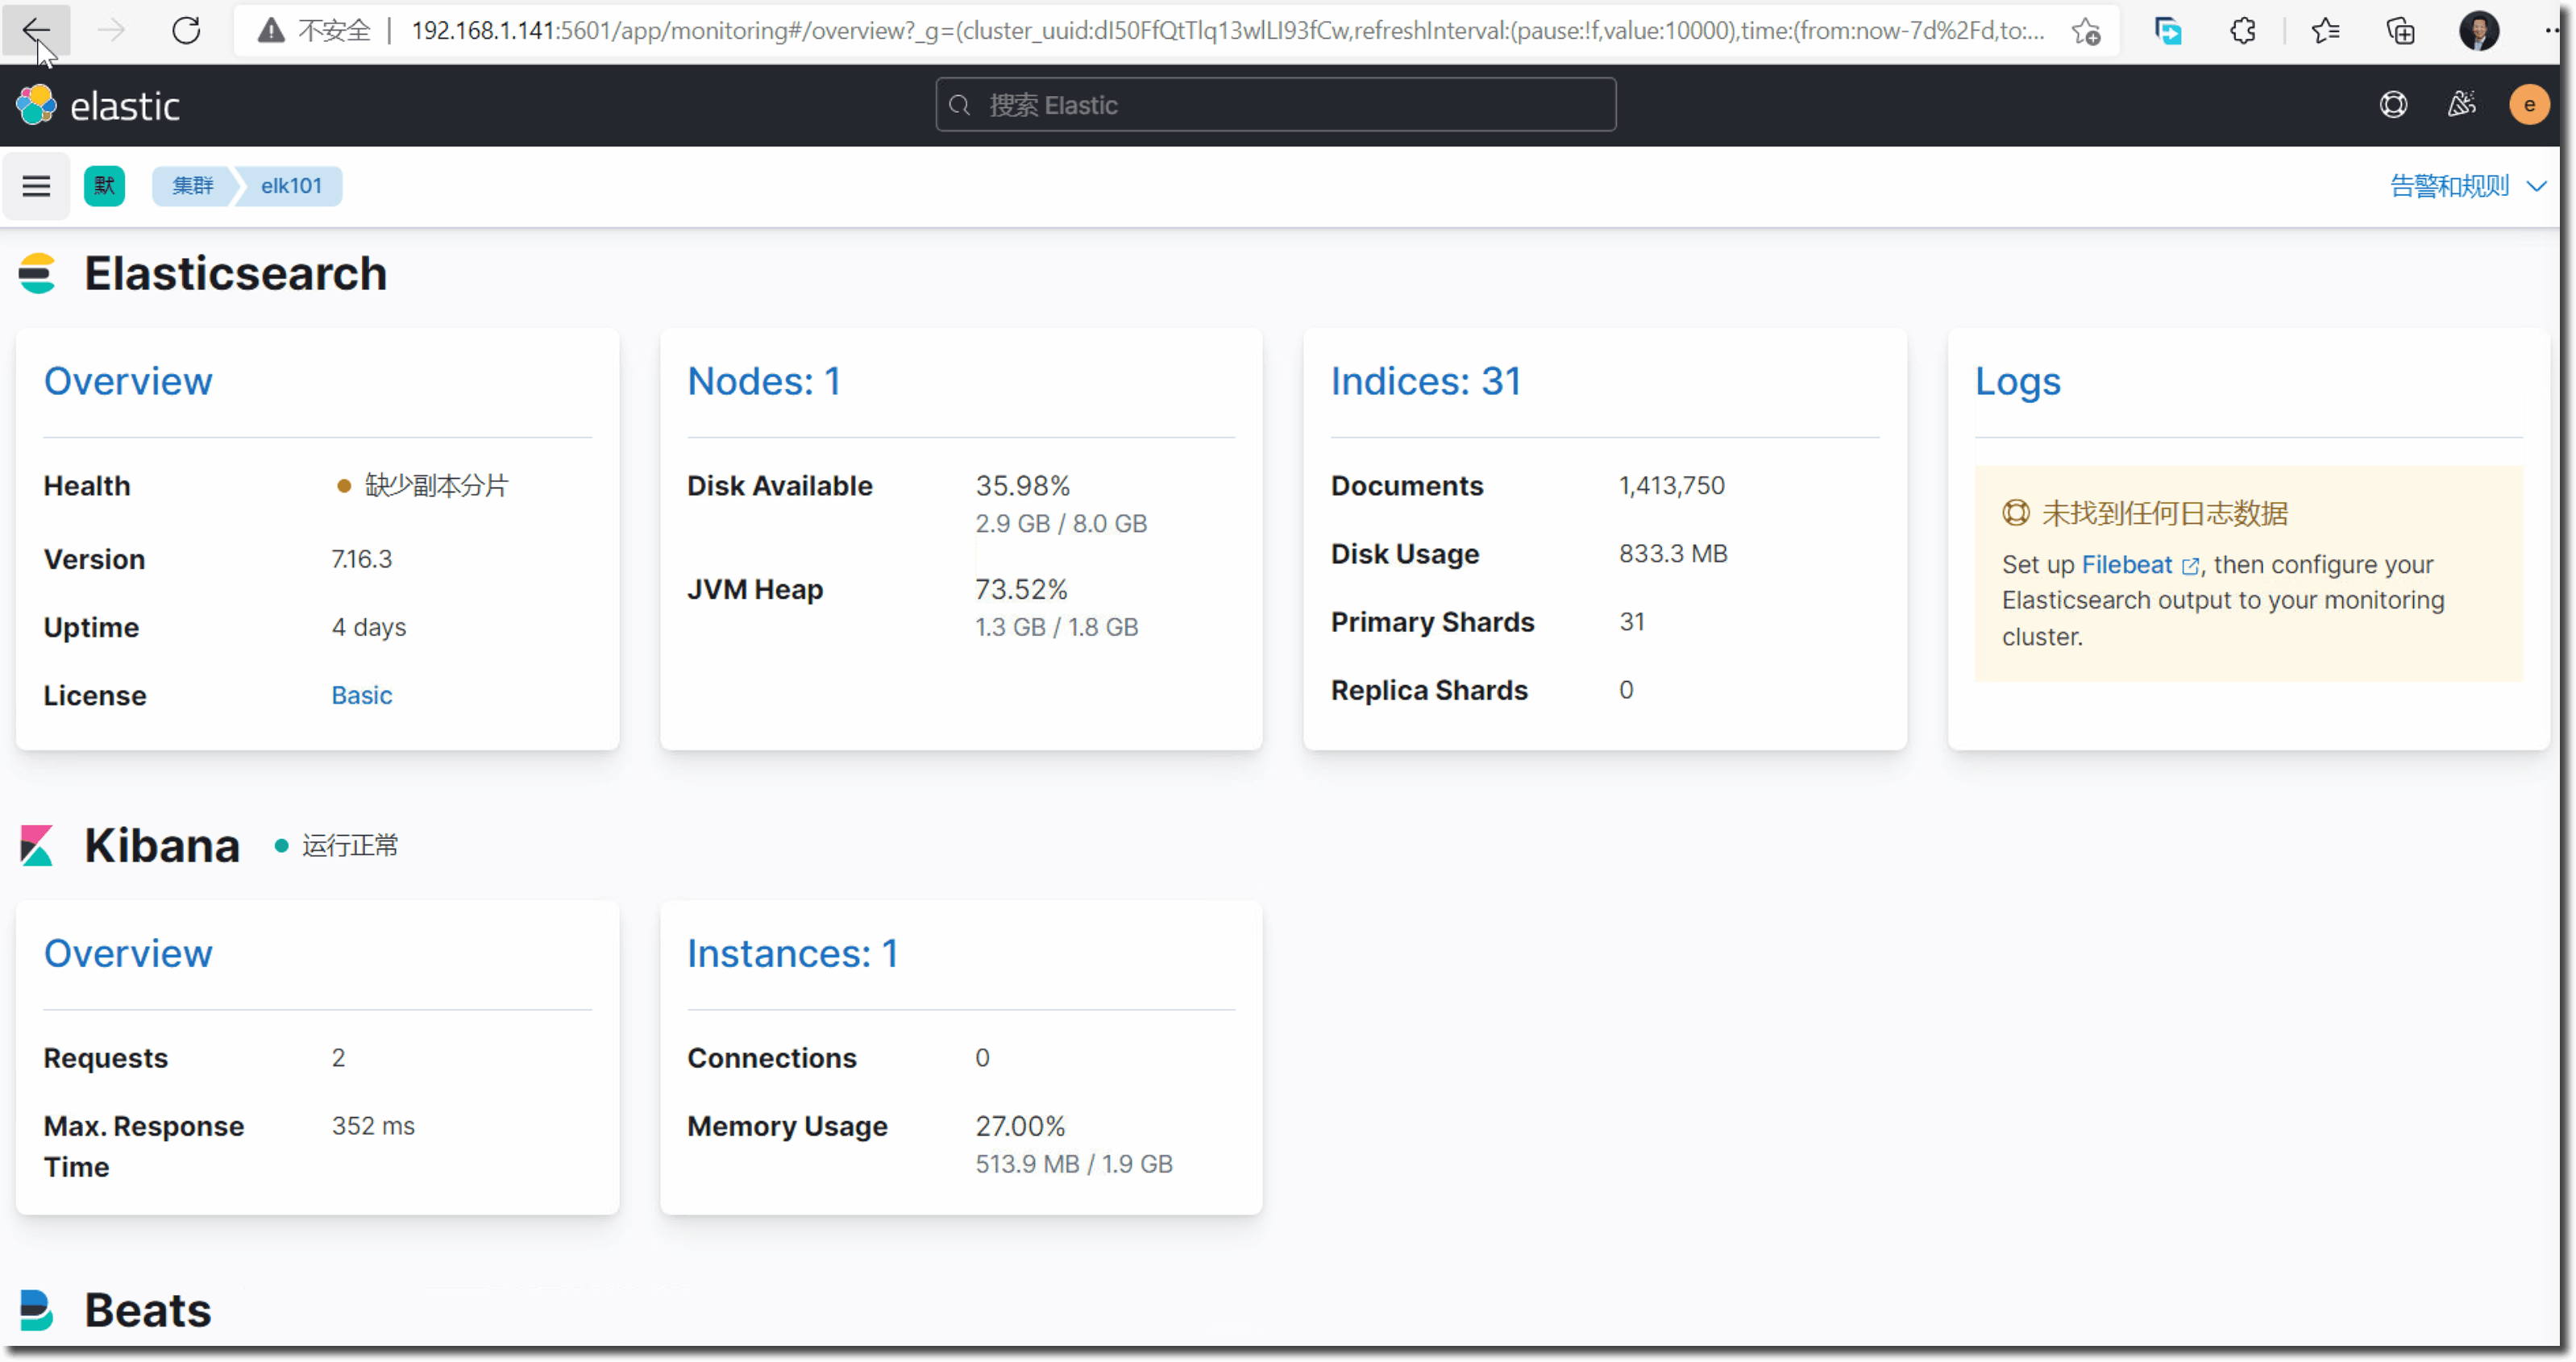
在 Stack Management 菜单中查看下面的重要选项,熟悉 Elastic Stack 的主要管理功能:
- 索引管理
- 用户
- 角色
- 索引模式
其它扩展练习【可选】
用上面所学到的知识,自行完成如下的扩展测试练习。
- 在 虚拟机1 上安装 Metricbeat ,并启用 Elasticstarch 和 Kibana 采集模块。
- 在两个虚拟机上安装配置 Filebeat,并启用 操作系统日志采集模块。
- 在 虚拟机2 上下载另外的大数量 csv 文件,尝试将其加载到 Elasticsearch 中,并在 Kibana中对其分析。
扩展工作坊推荐:
- 可观测性 :https://elastic.martinliu.cn/codelabs/elastic-observability-foundation/#0
- Elastic 安全 :https://elastic.martinliu.cn/codelabs/elastic-security-foundation/#0
- 企业搜索 : https://elastic.martinliu.cn/codelabs/entprise-search-foundation/#0
官方参考文档: